Set Printing for a worksheet document in MS Excel
Set Printing for sheet content MS Excel 2016
See Previous Post: Understand Fill Handle worksheet Microsoft Excel 2016
In the previous post, the Fill Handle was part of the discussion. And, now we’ll know how to set up print for the Excel data, in this post. The Page Layout tab has the Page Setup group. So, this group has total Seven buttons.
Firstly, the Margins button, the Orientation button and the Size button are first three buttons. Then, are the Print Area button, the Breaks button, the Background button and the Print Titles button.
Set Printing for sheet content Microsoft Excel – continued
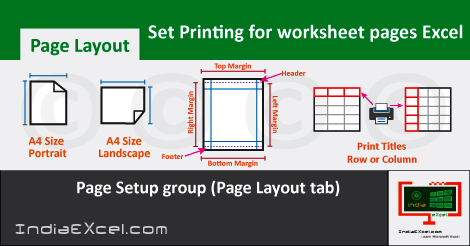
The Page Setup group helps to set Printing for worksheet documents. Especially, a Margin is the amount space/blank area, that is left in printing pages. The reason for doing so is that, the documents should remain uncluttered.
And, if we’ll not set any margin, the whole printing page will get fill up with the content. In addition, a page has the Top Margin and the Bottom Margin. Also, it has the Left Margin and the Right Margin with a Header and a Footer.
Significantly, we can increase or decrease the margins, depending upon the requirements. The Margins buttons sets the Normal, the Wide and the Narrow margins of a page. So, the default preset dimensions in Centimeters for the Margins’re mentioned below.
- Normal
- Top: 1.91 cm
- Bottom: 1.91 cm
- Left: 1.78 cm
- Right: 1.78 cm
- Header: 0.76 cm
- Footer: 0.76 cm
- Wide
- Top: 2.54 cm
- Bottom: 2.54 cm
- Left: 2.54 cm
- Right: 2.54 cm
- Header: 1.27 cm
- Footer: 1.27 cm
- Narrow
- Top: 1.91 cm
- Bottom: 1.91 cm
- Left: 0.64 cm
- Right: 0.64 cm
- Header: 0.76 cm
- Footer: 0.76 cm
Further, the rotations for a page, is set using the Orientation button. If we need a Horizontal Print of the Page, then the Landscape Option should be selected. And, the Portrait Option sets the Vertical Print of a Page.
Set Printing for sheet content Excel 2016
Furthermore, the Size button which has the preset Page types, is also necessary while printing pages. Generally, the A3 Size and the A4 Size for both orientation views’re commonly used. Then, the Print Area button has the Set Print Area and the Clear Print Area options .
By using the Set Print Area, users can select and mark a range of cells for printing; before going to the Print Preview. And, the Clear Print Area helps to remove the area, marked for range of cells for printing.
Even more, the Breaks button helps to insert a area break in a page. This helps to start the next most page from that break for printing. Then, the Background button helps to insert an image, picture or photo in a sheet. But the the Rows and Columns show above this inserted picture.
Lastly, the Print Titles helps to select the Rows and Columns; which gets repeated at the top of a page every time while printing. So, by using the Print Titles button we’re able to print; the Top Title of the First Page on top of all the other Pages.
See Next Post: Understand Quick Access Toolbar (QAT) Microsoft Excel 2016

Stay Connected
Connect with us on the following social media platforms.