Microsoft Excel Posts & Guides
Wrap Text in Microsoft Excel (Fix Text Overflow Instantly)
Previous post: How to Use AutoSum in Excel (The Quickest Way to Total Data)
Have you ever typed a long sentence or a corporate address into an Excel cell, only to watch it spill over into the next column or get cut off completely?
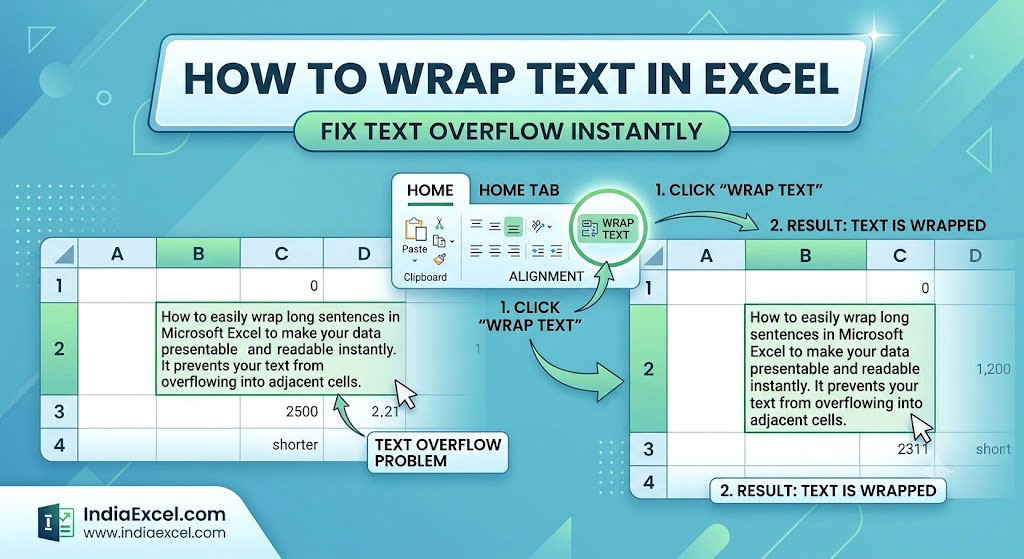
When columns look messy, data becomes unreadable. Instead of manually widening your columns and ruining your spreadsheet layout, you can use Wrap Text. This feature forces long text strings onto multiple lines within the exact same cell, automatically adjusting the row height to fit.
In this guide, you will learn the exact steps to wrap text, the fastest keyboard shortcuts, and how to fix cells when the wrap text button stops working.
Method 1: The Quickest Ribbon Button Click
The easiest way to wrap text across individual cells, entire columns, or rows is directly from your main toolbar dashboard.
- Select the cells containing the overflowing text.
- Make sure you are on the Home tab.
- Look inside the Alignment group and click the Wrap Text button.
Microsoft Excel will instantly break up your long sentences into multiple stacked lines, expanding the row vertically while keeping the column width fixed.
Method 2: The Pro Keyboard Shortcut (Manual Line Breaks)
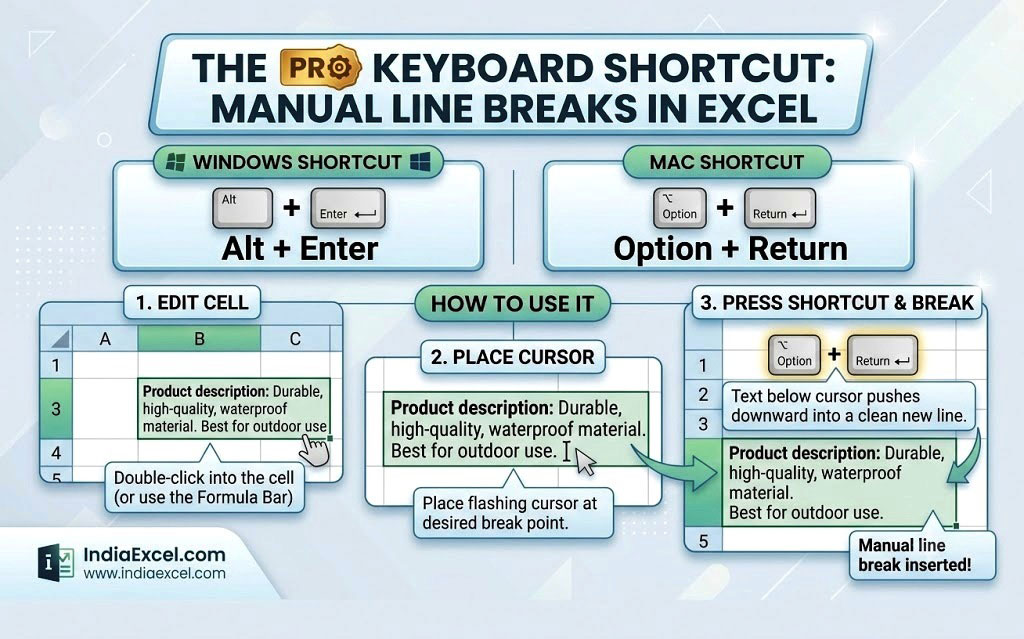
If you are writing a data sheet and want to force a line break at a specific word rather than letting Excel decide automatically, you can insert a manual line break using a simple shortcut.
- Windows Shortcut: Press Alt + Enter
- Mac Shortcut: Press Option + Return
How to use it:
- Double-click into the cell (or click into the Formula Bar at the top).
- Place your flashing text cursor exactly where you want the line to break.
- Press Alt + Enter. The text will push downward into a clean new line inside the same cell.
Method 3: Using the Format Cells Dialog Box
If you are formatting a large, complex dashboard template and want deeper control over your cell alignments, use the formal alignment settings window:
- Right-click your selected cells and choose Format Cells.
- Switch to the Alignment tab at the top of the popup menu.
- Under the Text control section, check the box for Wrap text.
- Click OK.
🛠️ Troubleshooting: Why is Wrap Text Not Working?
If you clicked the Wrap Text button and nothing happened, your sheet is likely suffering from one of these common formatting bugs:
1. The Row Height is Hard-Locked
If a row height has been manually fixed or restricted, Excel will wrap the text internally, but the row will refuse to expand downward to show it.
- The Fix: Highlight the broken row, go to the Home tab, look inside the Cells group, click Format, and select AutoFit Row Height. Your cell will instantly pop open to display all hidden text.
2. The Cells are Merged
Excel’s automatic Wrap Text engine struggles to compute vertical expansions on merged cells (e.g., if you combined cells A1 and B1 together).
- The Fix: You must unmerge the cells first, apply Wrap Text to a single cell, and expand the individual column width manually to balance the look.
❓ Frequently Asked Questions (FAQ)
How do I remove Wrap Text from an entire spreadsheet?
To clean up your layout, select the entire sheet by clicking the small triangle in the top-left corner of your grid (above row 1 and to the left of column A). Then, click the Wrap Text button once or twice to turn the feature off globally.
See Next Post: How to Create and Edit Custom Lists in Excel (The Ultimate Sorting Guide)